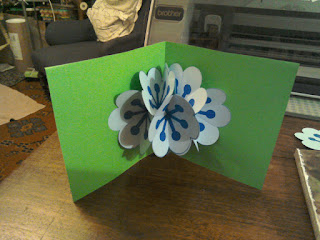
This is what you will be making: A Posy of Flowers Pop Up Card:
 |
| Posy of Flowers Pop Up Card |
This uses 7 paper flowers, that you can make manually and then glue together OR you can make them using only the SNC machine, or you can make them in Canvas and import them to the SNC machine for cutting.
If you have 8 paper flower and glue them slightly differently, you can make a full globe shape that can be used for a garland.
THIS Project post is purely the way I currently manipulate basic shapes in the machine. Because that's what I'm exploring now. As I get to know more about the machine, I'll revisit this Project and refine it when I find better/ quicker/ easier ways to do it.
WHAT'S INVOLVED?
Part 1. MAKING THE FLOWER TEMPLATE
Manipulating basic shapes in the machine using Add, Rotate, and Weld. The basic shapes used are a single petal for the 7 flower shapes required. This produces a basic non-decorated flower shape which I turned into a mock-up card like this:
 |
| Undecorated Flower Shapes as Pop Up Card |
PART 2. MAKING THE STAMENS TEMPLATE
Creating the Stamen shape from Basic Shapes - rectangles and circles, using Add, Rotate, Sizing, and Weld.
Drawing the stamens onto the paper, as well as the outline and cutting them out in a single mat session using Grouping, Ungrouping, and Autolayout. To do this you need to own the basic or Universal Pen holder for the Machine so that you can use the machine to draw before you cut. This produces a decorated flower like this:
I am fully aware that in Canvas (Brother's free software) you can set up both Drawing Lines and Cutting Lines, which means that you don't need as many steps as you do with this Project as currently written. However, the machine is sold as being able to be used without a computer, so as I am currently learning to use the machine, I'm seeing what the machine can do (or rather what I can work out to try it can do!) without venturing into the software. Feel free to go 'off piste' and do your own thing with the idea, using software or not!
PART 3. USING BOTH THE STAMENS AND FLOWER TEMPLATE TO DRAW BOTH AND CUT THE OUTLINE, THEN ASSEMBLING THE POP UP CARD
Cutting the shapes out using the Machine, making folds in the paper by hand (easy ones), and gluing the flowers so that they are 3D shape. Like this:
And finally, glueing each of the 7 flowers together in the right places so that they operate as a pop up card that folds flat for posting. Like the first picture at the top of the page.
A couple of extra things I need to say:
- When I'm learning to do something, I use cheap materials so that I can afford to make mistakes (or happy accidents) and not worry too much that I'm using up some special paper or card that I specifically want to make for a particular purpose or person. It allows me to develop an idea as I'm going along.
- Give yourself time to learn. Yes you can make this card very quickly once you know how. It's slower when you're learning, particularly if you've never manipulated shapes in the machine before!
- I personally use bog standard printer/copier paper 80gsm. I have some coloured, so I used that. White is just fine!
- For my machine for cutting 80gsm paper - I set the Speed ALWAYS at 1 (so the blade has time to do it's thing and I have time to press pause if it all goes pearshaped), for this paper Pressure is at 0, and my Blade is at 3. DO TEST CUTTING on the paper you want to use BEFORE you start the project. SET UP your paper on your mat and test cut it and write down the Settings. This will save you grumbling later!
- I also do TEST DRAWING. What I've found is that if I've got multiple images across the whole mat, depending on how much I've used the mat (ie it's stickiness) and the machine itself (ie the alignment), the pen sometimes misses areas. To save myself the agony of half drawings and having to fiddle on redrawing bits and not other bits, I've done Test Drawing so I know my Pen Pressure needs to be 1 to give a decent coverage across the entire mat.
- What you do is up to you in terms of testing, but I'm finding that Proper Preparation Prevents Poor Performance!
There's lots of videos on You Tube of how to make this type of popup card but they use manual scissors to cut and decorate the flower shapes.
Next part of the Project is HERE Part 1 - Making the Outline Flower Template


No comments:
Post a Comment